Wednesday, May 22, 2013

Getting anxious!

Things are about to get C.R.A.Z.Y up in this home! My husband, Jeff, is getting ready to deploy in a couple of weeks and I'm still in denial that this is really happening. We knew this day was coming, but the angst-ridden days are flying by so quickly now I can hardly catch my breath.  I've witnessed my friend's husband's deploy and return, read the facebook posts that paint a pretty good picture of what it's going to be like, but until it's our family's turn, I won't really know

Waiting is the hardest. As we nestle in to the final countdown until "the day daddy leaves" we make a nice cozy home for uncertainty, doubt, anxiety, and stress. My friends these are natural responses to a pending deployment, but it doesn't make it any easier.  Jeff wants to leave just to start the clock ticking until he comes home, but he worries about us and my sanity as he rides out his desert time.  And he has every right to worry, because daily life has been a little stressful lately! 

I want to share our family's deployment journey with you, not only as a cathartic exercise for my overactive brain, but as a source of encouragement. Because I have full confidence that God will bring us through this time apart, God will sustain our every need, God will counter my temporal feelings of being lonely, feeling helpless, tired, weary, and anxious with His love, peace, energy, and patience.  I'm counting on that!

Alright, first I am going to share my deployment survival plan. Because if I don't have a plan, I will feel like I'm constantly lost without purpose. This is the skeleton of my plan:

DEPLOYMENT SURVIVAL PLAN


1. Schedule our days: sounds easy, sounds boring. This is something I don't normally do, because I'm not crazy about scheduling stuff. It's funny, because as organized as I profess to be, I HATE schedules. My husband gets so frustrated with me on this one and even has the audacity to label me "undisciplined"! Ha! I'm also going to try to enforce an earlier bed time (for me, too) and wake up early to get a work out in without little people around.

2. Make meals easy: again, a no-brainer. But along with the scheduling, I'm going to make sure we have easy meals available so I don't lose my mind and feed them cereal every meal. (Hmmm...that doesn't sound so bad.....) I've already got a template going!

3. Plan care packages: I want to do a good job making sure that Jeff feels loved and connected to us.  I found a bunch of cool ideas on Pinterest here: http://pinterest.com/mcascio/deployment-cures/

4. Schedule "me" time and let people help: I'm definitely self-sufficient. Not in a proud I-can-do-it-all way, but more of a "I don't want to burden people with my crazy boys" sort of way.  I'm going to do exercise videos in the morning and ask for help so I can get away once a week!

5. Plan some fun activities: This is a pretty easy one. But even fun takes some organization. I want to have at least one fun day trip planned a month, and definitely easy trips to the pool, library, and other summer hot spots! 

So that's my plan. In the following days I'll share more about each list item. Talk to you soon!


Friday, February 8, 2013

Crafting with Boys: Valentine's Crayon Craft

Oh, hello there! I always assume that you are reading this while sipping on a nice hot cup of coffee, while your children play peacefully in the other room....ha! Who am I kidding? Your coffee is probably warm-ish by now (because you had to clean up the cereal spilled by the 2-yr old and break up 4 fights about whose hot wheels belong to whom) and you are just trying to catch some "me" time for a few minutes to distract you from the 379 other things you still have to do today.

And, maybe, like me, you are a Pinterest addict, too. And maybe, just maybe, you get a little "sidetracked" once you get there.  The sight of all those cool crafts just waiting to be lovingly put together by your hands...And if you have boys, ahem, ONLY boys in your brood, then sometimes getting them interested in a craft takes some coercing (with glue and camo stuff)!

BUT, it can be done. For instance, I just tidied up one of craft stashes. Yes, one of many. Many a time I've had to rescue a wine cork from the trash and try to explain to my incredulous husband that I was going to make this incredible cork board with it.  Anyway, I do save recycling stuff  because I will use it in some crafty project someday. My craft stash was overflowing. And neglected. So I rescued a big bag of broken crayons and determined to start and finish a valentine crayon craft. I saw it on Pinterest last year after Valentine's day and thought it was just the thing my boys would love to do!

So, crafty (or wanna-be crafty) moms, gather together your broken (or used, whatever) crayons, and let's CRAFT!

Valentine's Crayon Craft


Time: 1 hour (including cooling!)
(Don't let the list fool ya. It's pretty simple)
  • Broken Crayons (any kind will do!)
  • Silicone chocolate molds or shaped ice trays (I got mine from IKEA)
  • Knife
  • "Chopper" to break up crayons
  • Heavy Duty Craft Paper
  • Scissors
  • Glue (Hot glue or a tacky glue)
  • Marker (I used a fine point sharpie)
Preheat oven to 250° and pep talk yourself into a zen-like state. You'll need it, I don't care what they say about the "fun" of crafting with kids.

1. Peel the labels off the crayons. 

This is probably the most annoying part. It's best to slice a line down one side of the crayon while firmly holding it and trying to ward off your 2-yr old. Then hand it off to the professional "helpers" (eager boys) who will zealously tear the label off and beg for more than you possibly prep in this lifetime.  Okay, now that you have naked crayons, you can color code them (if you are type A, like me) or just throw caution to the wind and toss them all together in a big bowl and try to prevent your 2-yr old from tasting them.

2. Chop up the naked crayons.

This is the fun part. I used my Pampered Chef chopper (which has been put through worse abuse) and took my aggression out for about 10-12 good chops. You could even let the kids have a couple whacks at it! You could also use a knife, but I don't trust myself like that.  You want the pieces small enough so they fit into your mold (ours our pretty small). Since I color-coded, I put the crayons shards into muffin tins. Warning, try not to let the 2-yr old toss them all over the room like it's a crayon wedding or something. (Side note: to get crayon shavings off your wooden table, use a plastic scraper. Try not to be too upset about it, because it was probably the highlight of the 2-yr old's day)

3. Fill your molds with crayon pieces!

These should be oven-safe. We used IKEA ice trays like this. If you don't have an IKEA store near you, I feel bad for you, because we can seriously waste major time just running around there and it's fun. For real, if you don't have those cute little trays, you can buy the chocolate molds (silicone) from Michael's or Walmart or my other favorite place, Target. Fill them really full, kind of overflowing. Try different color combinations, throw some white in for a good contrast. Place all of your filled trays on a big cookie sheet (just so they are easier to handle) and then into the preheated oven.

Note - the "star" and "fish" trays were very hard to "pop" out. The small pieces broke off. I recommend only using the heart and flower so you won't cry once you've done all this work and you are supposed to leave for a Valentine's card exchange in 10 minutes and all of your fish tails are severed and your starfish amputated. Just fair warning!

4. Melt crayons in 250° oven for about 12-15 minutes.

Keep checking them, once they are melted evenly (no big chunks of crayon left) remove the trays from the oven. Let them cool for about 5 minutes until they are easy to handle, then pop the trays into the freezer. This lets them set up nicely. Remove from freezer after 5-10 minutes.

5. Pop the crayons out of the tray.

In theory, this should be easy. Some were harder to remove than others. Read my note under #3.

4. Assemble cute cards to mount the cute little crayons onto.

I cut out large circle (about the size of a coffee mug bottom) and a smaller circle (in contrasting color) and the boys glued these two together with a glue stick. Then, I had the boys write "Happy Valentine's Day" and "Your friend, _______" with a pen/sharpie. They also designed around the edge. I saw some cute sayings online, too, the pinterest example even had a cute saying on it "Happy Valentine's Day, for "crayon" out loud!"

5. Glue crayons onto cards.

If you have a glue gun, and you know where your back-up glue stick stash is, I recommend using it.  If not, or if, after a frantic search of every craft nook and cranny, you fail to locate aforementioned glue stick stash, use a tacky glue. We used one from Joann's. It's dries in about 35 minutes. But, if you happen to be running late and have to run out the door in 5, it will still work.

6. Sit back and enjoy the fact you made something with recycled items!


Thursday, May 12, 2011

Appreciation Gifts:Flower Pen Tutorial

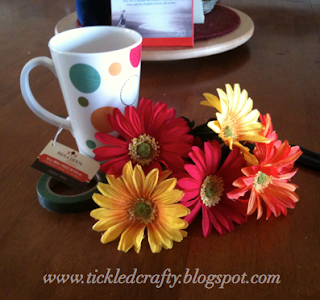
Last week was teacher appreciation week - and although I didn't get this tutorial up in time, I did get my oldest son's teacher a present on time! (Clapping and cheering from the moms out there with 3+ kids!) So, what did I make? Well, after scouring the internet, I stumbled upon Skip to my Lou's "Teacher Appreciation Ideas" and I was inspired by Somewhat Simple's Candy Gram Bucket of Fun....but I didn't have any candy, and I wanted to use a coffee mug. So....I whipped this up instead:


And believe me, if I can do it, you can, too! The best part is you don't have to wait until next teacher appreciation week to make one of these cool gifts....it would make a great Thank You gift for anyone! You could even make one for yourself, or make one for your church or school office...the possibilities are endless.  So, on with the tutorial (not that you really need one, it's pretty simple!

Flower Pen Tutorial:

What you'll need:
Container for "flower pens" (I used a cute Paula Deen mug I got at Michael's for $2!)
Artificial Flowers (I bought a cluster of 5-6 for $1.99)
Floral Tape
Pens (the retractable kind work best)
Mug "filler": I used coffee beans since it was a coffee mug and I had some that I was saving for just this project, you could also use sand (beach theme), split peas (a pretty green!), kidney beans, black beans, small pebbles or smooth glass stones


Directions:
1. Gather supplies.
2. Cut flowers from the "bunch". Leave stems as long as possible.
3. Hold Stem and Pen together, and then wrap with floral tape starting from mid-pen (where bottom of stem is). Continue wrapping floral tape around pen until you reach the top of the pen. When you are at top, wrap around a couple times to secure. Repeat for remaining pens.
4. Fill Mug 3/4 with your "filler". Place pens inside mug and arrange to your liking.
5. Fill the rest of the mug!
6. Embellish outside, if you want: tie a ribbon around it, attach a note, or attach a flag to a pen with your note: "Thank you, Teacher!"


Somewhat Simple

Tuesday, May 10, 2011

Tuesday Tip: Meal Planning, again!


I've addressed meal planning already, but not many people took me up on my FREE offer! I spent too much time on this beautiful planner to let you miss out on it, so here it is again:

Meal Planning is a frontier that a novice mommy rarely entertains. But not YOU, you wise and thrifty, mom of 2+ kids with cheerios on your floor and a pile of laundry at your feet, you know better. You know that a little meal planning goes a long way in helping to fight the dinner doldrums and angry mobs of children who don't want to eat peas and carrots again.

So, in the spirit of sharing, I'm going to let you in on my secret meal-planning weapon. A Meal-planning worksheet that makes it sooooo simple to look like a kitchen pro! I made it myself, because I like things cute, and functional, and I couldn't find anything else on the web that suited my purposes. If you do use it, please leave a comment, or link back to me.

Download it here: http://www.scribd.com/doc/54725424


Tip Junkie handmade projects
Today's Creative Blog

Monday, May 9, 2011

Made by Me Monday: Felt Bookmarks


Obviously, I've been on a felt kick for quite some time now. I made these cute little bookmarks for some church girls who are near and dear to my heart. Each one is personalized (with their initials on one side, and a picture that symbolizes them on the other).

They are quite simple to make - super easy if you are looking for a last-minute gift!

What you'll need
Felt Scraps in assorted colors
Embroidery Thread (I use the thread used for friendship bracelets)
Embroidery Needle
Ribbon in assorted width
Sewing machine (optional)
Pattern for picture (if you aren't good at winging it!)

Directions
1. Cut 2 shapes from felt for the background of the bookmark. The size I used was about 2 in. square. Cut 2 smaller pieces of felt for bottom of bookmark. (Use any shape, I used a square, star, heart & triangle on mine). Cut a piece of ribbon that is about 8-10 inches long (thin ribbon is fine, but I personally like the way the thicker ribbon looks).
2. Applique (by hand probably is easiest, but you can machine, sew, too if you're patient!) a design on one piece of felt and an initial (or initials) on other piece of felt.
3. Assemble: Sandwich ribbon between larger pieces of felt - you can add some permanent fabric glue to help the ribbon stay, but it probably isn't necessary. Do the same thing with smaller pieces of felt at bottom
4. Sew outer edges of large felt pieces (Hand or Machine), then sew smaller pieces together at bottom.
5. Give your bookmark to it's lucky recipient! (Or keep it for yourself, I won't tell!)


The Girl Creative


Thursday, May 5, 2011

Friday Blog Hop!


Home Grown Families


get the InLinkz code

Tutorial Thursday: Meal Planning

Meal Planning is a frontier that a novice mommy rarely entertains. But not YOU, you wise and thrifty, mom of 2+ kids with cheerios on your floor and a pile of laundry at your feet, you know better. You know that a little planning goes a long way in helping to fight the dinner doldrums and angry mobs of toddlers who don't want to eat peas and carrots again.

So, in the spirit of sharing, I'm going to let you in on my secret meal-planning weapon. A Meal-planning worksheet that makes it sooooo simple to look like a kitchen pro! I made it myself, because I like things cute, and functional, and I couldn't find anything else on the web that suited my purposes. If you do use it, please leave a comment, or link back to me.

Download it here: http://www.scribd.com/doc/54725424

Enjoy!